Training your lovebird - Clicker recognition training
We like to train our pets to do cute and amazing tricks. Lovebirds are no exception. YouTube is full of lovebirds doing amazing things. However, training your lovebird has to start somewhere.
When you want to train your lovebird, it is best to start with clicker recognition training. Which you can then follow up with target training. In this blog post I will explain what clicker training is and why communication with you lovebird will help with its training.
What is clicker recognition training?
With clicker recognition training we use sound to communicate with our bird. Using a clicker device we can get our lovebird to associate the sound of the clicker with a treat.
Why you should not start with target training
When you skip clicker recognition training and immediately start with target training, your bird has to learn a lot more at once. First off, it needs to associate a click with a treat. Secondly it needs to reach a goal for a click to be sounded and for it to get a treat.
If you start with target training your bird will get confused and it will not fully understand why it is getting a treat, this means training will take longer.
If you start with the clicker recognition training, your lovebird will already understand what the click stands for, so it only needs to learn only one thing at a time.
The required tools for clicker recognition training
For clicker recognition training you only need two things. A reward and a clicker.
What kind of reward
The reward you give your lovebird needs to be something it absolutely loves. This can be safe nuts for your bird to eat, or certain seeds your bird goes crazy for.
Another requirement is that it needs to be small. If it is too large it will chew onto it too long and will forget the connection between the click and the reward. Keeping the reward small will keep your bird’s attention on you and the clicker sound.
What you can use as clicker
You can make click noises with many things, like a clicker device available at pet stores or even a pen. What is important is to keep the sound consistent.
Making clicking noises with your mouth is possible, but not recommended, as it can be hard to be consistent and will prevent others from training your lovebird as clicking sounds from the mouth can be constantly different.
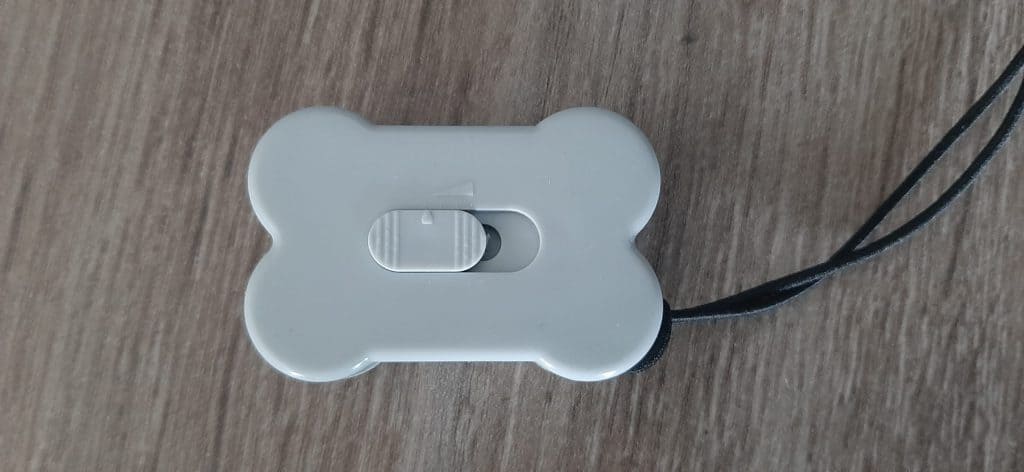
I personally use a clicker. Mine is in fact meant for dogs and is shaped like a bone. The sound is consistent with the same volume and the same tone. This makes it easier for my lovebird to understand what is going on.
Your first clicker recognition training
If your lovebird has never done clicker recognition training before, you want to give a treat at the same time you use the clicker, this way they will start associating the sound with a treat. It will also help make sure your bird does not worry about the noise that might have startled them as food is more interesting, especially food they really love to eat.
Timing is of the essence here. Make sure you already have the treat in your hand before you click.
What not to do when giving the reward
When using millet, don’t use the entire thing at once. It will have a negative effect as your bird will think about how it was not able to eat all that food rather than concentrating on its training.
Also don’t let your lovebird pick out one seed among a hand full of seeds rather offer one seed at a time or it will have the same negative effect as the millet.
How to recognize your lovebird understand what a click means
Every bird is different, so you need to keep a close watch on your bird’s body language. Some of the signs you can look for:
- Is it launching for a treat you are about to give?
- Is it already opening its beak?
- Does it turn its attention to you the moment it hears a click?
Next steps of clicker recognition training
It is time for the next step when your lovebird is comfortable with the click sound and relates the sound to a treat.
Instead of giving your lovebird the treat at the same time as the click, now you give it after the click. As it starts understanding the delay, you can slowly increase the time between the click and the treat.
Your own body language during clicker recognition training
While you are training your bird, make sure to keep an eye on your own body language. You don’t want your lovebird to respond to a certain movement, for example, your hand.
Training session length and frequency
A training session should not be longer than 10 minutes. You want to let your lovebird rest for a while if you want to do multiple training sessions in a day.
Doing more than one training session a day isn’t required. Doing them once a day or only on the weekend will work just as well, it just might take a bit longer.
For the best outcome, it is important to recognize your lovebird’s body language. If your lovebird is starting to get tired, even before the 10 minutes is up, you should stop training.
Best way to stop a training session
Stop your training session at the peak, when your love bird wants more. By keeping your bird in the wanting more stage it will make a positive connection with the training session.